Joe Martin Foundation "Metalworking Craftsman of the Year" award winner for 1997
With the cam cover removed on the 1/8 scale version of the engine, the 4 cam gears can be seen. (Click on photo to view larger image.)
If you haven't already done so, read more about Jerry Kieffer, his background and his quest for total scale in his introductory page. There you will also find links to other model engines, tools and clocks he has made.

Jerry Kieffer displays the current progress on the tiny Harley at the 2012 NAMES show in Detroit. When looking at the individual close-ups below, keep in mind how small this model really is! (Click on photo to view a larger image.) Photo: Ken Foran
Jerry Kieffer prefers to work from the real thing when building his scale models. In this case, he actually does own a 1947 Harley Davidson "Knucklehead" motorcycle that he completely restored. That means he can measure each and every part of the real bike to make the scaled down parts for his models. His plan was to model the entire motorcycle and have the motor run and all the systems work. He started with a 1/6 scale model and built the entire engine. It is completed and runs fine, but after thinking more about the project, he felt to model the entire bike at that scale would produce a finished model that would be too large for his liking. Rather than continuing on, he left the first engine as a running display model and started over from scratch in 1/8 scale. The second Harley is now under way and coming along nicely. Photos below will follow the progress as the bike is built piece by piece in complete scale.
One of the ways Jerry challenges himself is to announce beforehand what he intends to accomplish. Sometimes he regrets this later when he runs into seemingly insurmountable problems with a build, but the pressure of coming through with what he has promised causes him to work at a problem until finding a solution rather than simply giving up. In this case he has stated that he wants to be able to start this tiny engine with a kick starter just like the real engine. He also wants the gearbox to function and the speedometer to work. These are some pretty incredible goals when you look at the small size of the bike and think about duplicating all the parts of a transmission or a speedometer and drive in 1/8 scale. Many of the parts are hard enough to make at full size, much less 8 times smaller. Keep in mind that when reducing in size, the part size goes down as a function of the cube root of the volume, not as a simple linear reduction. For example, the volume of a part at 1/2 size is actually 1/2 the length times 1/2 the width times 1/2 the height. That means the 1/2 size version of a 1" cube would be a cube .5 x .5 x .5 or .125 cubic inches—1/8 of a cubic inch. A1/8 size model of a 1 inch cube is .125 x .125 x .125 which equals .00195, or less than 2 thousands of a cubic inch!
February, 2012—See http://watch.discoverychannel.ca/daily-planet/february-2012/daily-planet---february-13-2012/#clip618305 to view a segment on Discovery Canada from a show called The Daily Planet. The "Garage Guru's" segment details Jerry's work building a 1/8 scale Harley Davidson. (It is the second segment starting at the 8:00 minute mark.)
(Click photo for larger image.)
The full-size prototype |
|
 |
The first photo shows Jerry's actual restored 1947 Harley Davidson "knucklehead" motorcycle. Jerry's dog poses in the sprung seat. The bike is show quality and isn't ridden because there are zero miles on the NOS speedometer. This bike is being used as the prototype for Jerry's models. Each original part is measured and duplicated in miniature. |
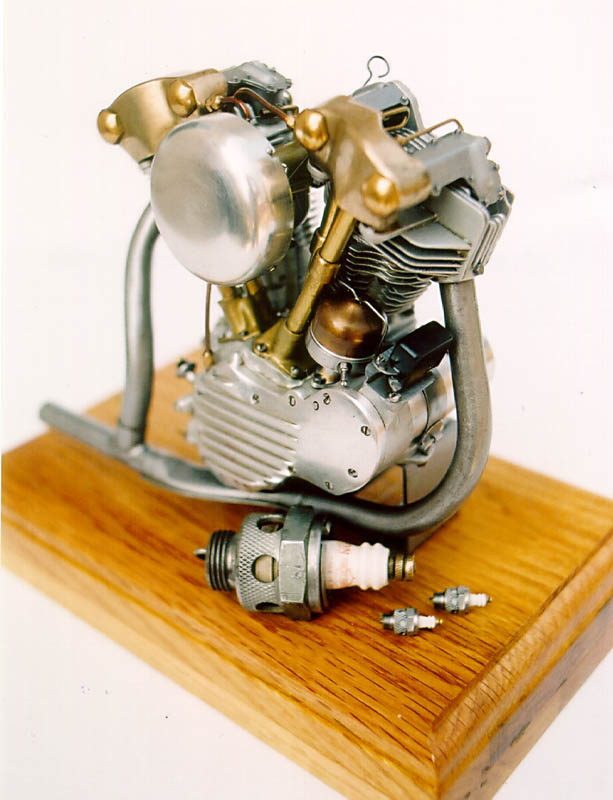
The 1/6 scale engine model |
|
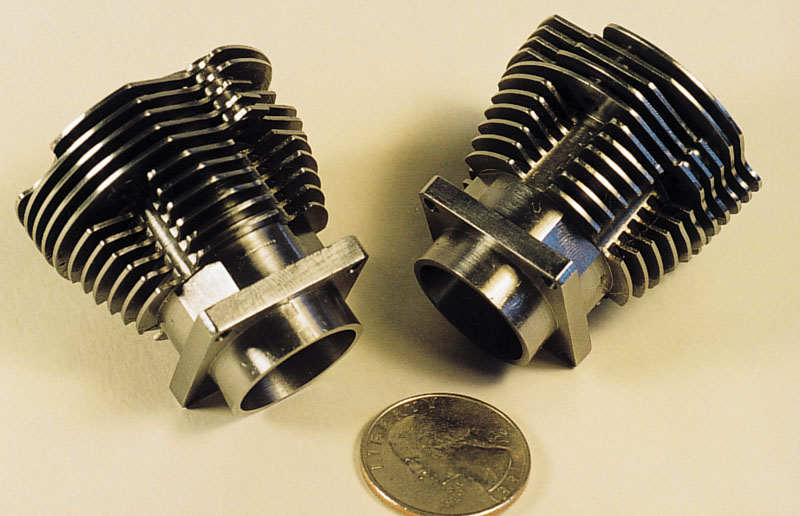 |
Cylinder barrels from a 1/6 scale model of a 1947 Harley Davidson "Knucklehead" motorcycle illustrate some of Jerry Kieffer's talent with metal. This engine is now complete and running. This pair of cylinders was an early version that Jerry later decided needed a slight change, so he made them over. These can be seen on display in the Craftsmanship Museum in Vista, CA. |
|
The model is a 1/6 scale version of the original and actually runs and sounds like a Harley. It was machined from bar stock...no castings were used. The oil pump, sending unit, distributor, generator and regulator are also functional. The cylinders will eventually be painted and the brass areas will be nickel plated like the original. Next to the engine in the photo is a full size air cooled spark plug compared to the 1/6 size spark plugs used in the model. Jerry planed to build a model of the complete motorcycle but felt this engine is too large for that project. Continue below to see progress on the 1/8 scale version he is now making. |
The 1/8 scale model in progress |
|
 |
Engine—The 1/8 scale engine is coming along nicely. Here it is shown with the pushrod tubes and cam cover in place. The intake manifold and carburetor are also installed. |
 |
In the first photo the engine sits next to the frame which has the transmission installed. The second photo is a detail showing the kick starter, internal gears and some of the other transmission parts. A US Quarter in the foreground shows you how small these parts actually are. |
 |
Frame—The engine and transmission are now installed in the frame. The all metal frame is so perfect that the occasional show spectator will ask Jerry, "Is it made out of plastic?" He simply smiles and say, "No," understanding it was not meant as an insult but is actually a compliment to the quality of work. |
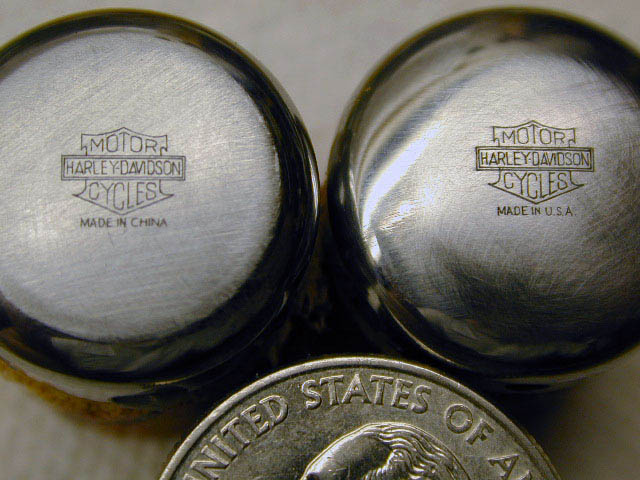 |
The 1/8 scale Harley air cleaner on the right was made by Jerry. He sent it to engraver Roger Ronnie to have the Harley Davison Logo engraved in 1/8 scale. As a practical joke, Roger made the air cleaner on the left, engraved it and gave it to Jerry. Upon close inspection with a jeweler's loop Jerry could see that the tiny letters under the logo said, "Made in China." After Jerry recovered from the surprise, Roger presented him with his actual air cleaner that did say, "Made in USA" like the prototype. Roger's version is on display in the Craftsmanship Museum for your inspection if you can come visit us in Vista, CA. The correct one will be fitted to the engine when it is completed. |
 |
Kick Starter—A key to this project as far as Jerry is concerned is that he wants the bike to be able to be kick started like the original. This presents a number of engineering challenges because of the small size. |
|
|
One problem you run into building running engines this small is that not everything can be scaled down. Engine compression is one of those things. If you scale down all the parts of the original kick starter system but keep the compression near that of the original, the tiny parts can't handle the load. These two photos show the primary cover in place and the gear set exposed with the cover off. In the second photo you can see Jerry's solution to how to beef up the kick start mechanism to handle the compression with tiny parts. Behind the gears is a ratchet setup that turns the engine over when the kick starter is pushed, but once the cover is in place, nobody will ever know how it's done. |


 Photos: Forrest Atkinson |
This is the kind of hidden engineering that separates the real engine modelers from the "instruction followers." Here is how it works: In the first photo the rack gear is not yet engaged with the driving gear. When the kick starter lever is engaged, a spring pulls the rack gear down so it engages the driving ratchet gear (photo 2) that is connected to the primary gear train. As the kick starter moves through its travel to the end (photo 3) it turns the motor over the same number of degrees as the original kick starter did. If the engine fires mid-stroke, the shape of the gears kicks the rack gear out of the way, avoiding an old Harley injury commonly know as "Sportster Knee" where the engine would kick back unexpectedly on the starting lever and either toss the rider over the handlebars or injure his knee. In this case, "Sportster Finger" will be avoided by Jerry's design. He says the sound of the rack feeding back over the ratchet gear even mimics the actual sound of the real kick starter. There is several weeks work involved here just getting the shape of the teeth right between the rack and ratchet gears so it both engages firmly but also kicks out like it should. |
 |
Cables—The clutch cable was made using a special fixture Jerry designed and turned on a Sherline lathe. The lathe was also used to wrap the wire for the outer cable using this fixture. The inner wire that will actuate the clutch is .010" in diameter and slides freely within the outer cable housing, which is wrapped using .007" wire to an outer cable diameter of .032". It took several tries and weeks of work to design a wrapping fixture that worked, but it works very smoothly. |

 |
Wheel Spokes—The wheel spokes are perfect 1/8 replicas of the real spokes. They include a swedged end and a threaded end. The spokes are .020" in diameter and the thread is 190 TPI. The nipple threads onto the spoke for tightening and adjustment as is practice on full-size wire wheels—it is not simply laced with wire as is done on most model wire wheels. Over 100 of these spokes must be produced and eventually individually installed and tightened. The first photo shows the nipple threaded onto the spoke and the second shows it removed so you can see the threads. Jerry expects the wheels, including spokes, rims, valve stems, brakes and bearings to take about 1 year to complete. (2/09) |

 |
Wheels—At the NAMES show in April, 2009 Jerry brought the nearly finished front wheel to display. Note the tiny valve stem. Yes, it does contain a working Shrader valve, and the brass valve cap has the correct number of knurls. |
 |
The motorcycle's front forks, handlebars, suspension and headlight are also well along. The throttle cable is installed and works when the throttle is twisted on the handlebars. (4/09) |

 |
A year later the wheels are done, including over 100 threaded spokes and two working 3-piece Schrader valves for airing up the rubber tires. The twist throttle on the handlebars works the throttle cable. (4/28/10) |
 |
A close-up of the front wheel shows the drum brake with the brake cable coming to it. The threaded nipples on each wheel spoke can also be seen as can the bottom end of the "springer" front suspension. |
 |
More photos of the Harley were taken at the NAMES show in April, 2011. Here are a few details. This first photo shows one of the scale spark plugs. It is made in two pieces just like the full-size version. |


 |
Two right side and two left side photos show overall progress on the bike. |

 |
Cables and wires are now in the handlebars. The rear brake assembly is also shown. |

 |
Oil Bag—The oil bag (tank) will go under the seat. Note the tiny wing nuts. The second photo shows a setup Jerry demonstrated at the show. Spectators could look through the binocular lenses of the microscope Jerry had attached to his Sherline mill and see the tiny gear he is pointing to in total detail. A tiny gear tooth cutter is behind his fingers to cut the teeth for this little distributor gear. |

 |
In March, 2012 Jerry sent these photos showing the Harley in its current state of completion. The Schrader valves in the wheels are now complete, and the tires are inflated to 4 PSI. This is 1/8 of the inflation of the full-size bike and yields just the right amount of flat spot on the tires when the weight of the bike is resting on them. the cables are in place but some have not yet been connected. The seat pan has been made but is not installed in these photos. |

 |
In April, 2012 Jerry brought the model with him to the North American Model Engineering Society Expo in Wyandotte, MI. Seen here are some close-up photos showing the addition of the seat, working speedometer and Schrader valves in the wheels. The copper seat pan was formed and is ready for a leather cover. (First photo: Ken Foran. Others that follow, Craig Libuse) |
 |
The engine and primary cover are seen from the left side. |

 |
A top view of the left side of the engine shows the open spark plug hole. The right side of the engine shows the characteristic "Knuckle" shaped rocker box covers and the brass oil tank as well as the kick start pedal, carburetor and brake lever. |

 |
Tire, wheel, brake and fender details. The gray metal is bead blasted steel. Jerry keeps it covered with a coating of oil to keep rust from forming until it can be painted. |
 |
Rear fender and muffler detail. |
 Click here for a VIDEO of the speedometer in action. |
Speedometer—The working speedometer is about 1/2" in diameter. To see a video of it in action, CLICK HERE or on the word "VIDEO" below the photo. The short video shows Jerry spinning the speedometer shaft to get the needle to move. He notes that, like the full-size speedo, the needle bounces around a bit in the lower speed ranges but smoothes out as speed tops about 40-50 MPH. Just getting the tiny magnets properly placed in this little gem took several months of adjustment, but a working speedometer was one of the main features Jerry had set as a goal at the beginning of the project along with a kick starter, working brakes and transmission and pressurized tires. |
|
|
Drive Chain—Jerry's original intention was to stamp the sides of each drive chain line, but the quality of the stampings wasn't up to his standards, so he ended up machining each one. For size reference, in the second photo the lines on the scale are .011" wide. The final photo shows the chain installed on the bike with the primary removed. Jerry notes, “The chain itself has 440 separate parts that needed to be machined including the master link. I made dies for stamping the side plates or links, but the quality of the stamping and the amount of finish work required for the quality desired was prohibitive when considering the final result. In addition, another 220 separate bearing pin rivets were required for assembly of the chain.” (12/3/13) |

 |
Shifter and Lock Cylinder—The first photo shows the brake lever, gas cap and gated shift lever on the left side of the tank. The working speedometer will go in the hole on top of the tank. The second photo shows a detail of the tiny ignition lock cylinder and keys. Inside the cylinder, tiny coils of .001" diameter wire push on the pin tumblers. (3/2/16) |

 |
The bike is almost finished. The decision now is to paint or to leave it in raw metal. (3/2/16) |
| more to come... | Photos will be added as they become available. Check back now and then to follow the progress of this project. |
![]()
If you have additional information on a project or builder shown on this site that your would like to contribute, please e-mail mecm@craftsmanshipmuseum.com. We also welcome new contributions. Please see our page at newsubmit.htm for a submission form and guidelines for submitting descriptive copy and photos for a new project.
![]()
This section is sponsored by

Makers of precision miniature machine tools and accessories. Sherline tools are made in the USA.
Sherline is proud to confirm that Jerry Kieffer uses Sherline tools in the production of his small projects.
To learn how your company or organization can sponsor a section in the Craftsmanship Museum, please contact mecm@craftsmanshipmuseum.com.
RETURN TO MUSEUM HOME PAGE
Copyright 2009, The Joe Martin Foundation for Exceptional Craftsmanship. All
rights reserved.
No part of this web site, including the text, photos or illustrations, may be
reproduced or transmitted in any other form or by any means (electronic,
photocopying, recording or otherwise) for commercial use without the prior
written permission of The Joe Martin Foundation. Reproduction or reuse for
educational and non-commercial use is permitted.