
Added to museum: 6/4/2015
Ken Condal (Click on photo to view a larger image.)
Ken Condal was introduced to woodworking at the age of seven. While converting the basement into a playroom for Ken and his brothers, his dad taught him to use basic hand tools. Ken still remembers the fascination of watching raw lumber being turned into walls and built-in cabinets. While growing up, Ken used those skills to build forts, tree houses, go carts and even a pair of stilts. A high school shop class introduced him to power tools and much more refined techniques.
But woodworking was just a hobby. Ken studied Chemistry in college, but it wasn't the career he was looking for. Computers were in their infancy with paper tape and punched cards, and just like woodworking, he soon realized that those simple things could be turned into complex programs that solved real world problems. Ken switched careers and his first job was mounting tapes in a large computer room. A year later he was programming.
There wasn't much down time in the computer field, but Ken made the time. He became addicted to This Old House, The New Yankee Workshop and other shows of that type, learning more advanced skills. There was no Internet at the time, but there were lots of woodworking magazines and Ken read them all.
First came simple pine furniture, stained and coated in varnish. Friends would ask, "Did you make that?" Although it was meant as a compliment, Ken never took it that way, always thinking "I've got to do better".
As the years passed, he acquired more skills, more tools and enough money to start using exotic hardwoods. No more stain and varnish - now it was hand rubbed oil finishes. Instead of being asked "Did you make that?" Ken was being asked "Where did you buy that?"

A MIDI guitar required combining woodworking and electronics. (Click on photo to view a larger image.)
Now, having reached his goal with furniture, Ken decided to try something crazy - build a self-playing acoustic guitar. This would combine his love of woodworking, music and computer programming. The end result didn't look like a guitar, but it sounded like one. Rather than having a mechanism to fret the strings, Ken pre-fretted them, creating an instrument with 42 strings. Each string could be plucked by a servo, receiving its instructions from an onboard Arduino, which in turn was receiving notes via a MIDI stream from a laptop.
Ken thought he could make the pluckers (odd shaped servo arms with picks attached) using a router table and a template, but that proved to be both difficult and dangerous due to their small size. He had seen videos of CNC machines but didn't know much about them.
Some online research lead him to the Sherline site where he found a package containing a desktop mill, lathe and computer. He joined a Yahoo group devoted to Sherline CNC users and asked a bunch of questions, which were promptly and courteously answered. The next few weeks were spent watching YouTube videos of people making amazing things, though mostly in metal. Ken was hooked! He had always been fascinated by museum pieces made in metal, so the tools could be used to finish the guitar and then graduate to metal working.
Ken bought the Sherline package and spent a few days setting it up and learning the very basics - like moving an axis. Now what? To proceed any further would require a CAD/CAM package and learning how to use it. Then came material and tool selection, feeds and speeds, fixturing and on and on. Almost a year went by, learning the ins and outs of CNC machining and accumulating quite a scrap pile.
Now it was time to take the guitar out of storage and complete it, which he did. But as all this was going on, Ken realized that his small shop couldn't accommodate the delicate Sherline machines and their computer with the constant cloud of sawdust the large woodworking tools generated. Sadly, he made the decision to give away all of his woodworking equipment but happily he found a young man who had the same passion he did at that age. Moving forward, all of Ken's projects would be metal.
First up was a lightsaber, because every Jedi needs to make his own lightsaber. Ken had no idea what he was getting into for a first project, but he soon found out. Turning and milling was to be expected, but internal and external threading and fourth axis knurling were a lot to learn.
At first the plan was to just make the hilt, but Ken found a small piece of electronic wizardry that could light a straight neon tube starting on the near end (at full brightness) and extending the light to the far end, all controllable by a variable resistor. Once the decision was made to use this, the design began to take shape. All he had to do was figure out how to cram the electronics, two 9 volt batteries, a variable resistor slide switch and an on/off switch into the hilt. Much time was spent finding stock aluminum tubes that had the dimensions necessary so that they could be machined and mated with internal and external threads, yet still had enough interior room to fit the electronics and batteries.
Since this was Ken's first metal project, a lot of trial and error pieces ended up in the scrap bin. When he decided to inlay brass into the aluminum hilt (because woodworkers love inlays) things got even more problematical. But Ken wasn't done complicating his first project. He had found a Jedi font online and wanted to engrave "The force will be with you. Always." (in Jedi) around the cylindrical hilt. How hard could fourth axis engraving be?
The project took nearly a year but all the techniques he learned along the way would be useful on future builds. Plus, the lightsaber is a real conversation piece when friends see it for the first time. Ken built a stand to display it using black Corian and clear acrylic, two materials he'd frequently use in future projects.
The next idea came from Ken's son who gave him a working replica of the cryptex from The Da Vinci Code movie with a simple note attached, "To inspire your next project". Naturally, Ken soon had the cryptex in pieces to examine its inner workings.
A cryptex consists of nested cylinders with an outer ring of letter dials. Only when the dials are turned to spell a specific word will the cryptex open to reveal its secret contents. Internally, a cryptex is similar to a key turning the cylinders in a lock. The difference is that the key remains stationary inside the cryptex and the cylinders (with the letters on them) are turned until they align with the key.
The internal mechanism required some very precise machining which Ken says he really wasn't prepared for. The outside, on the other hand, was fun. Once again he had to do some fourth axis engraving of the letters. This time the inlays, used to mark the selected letter, were made of wenge hardwood.
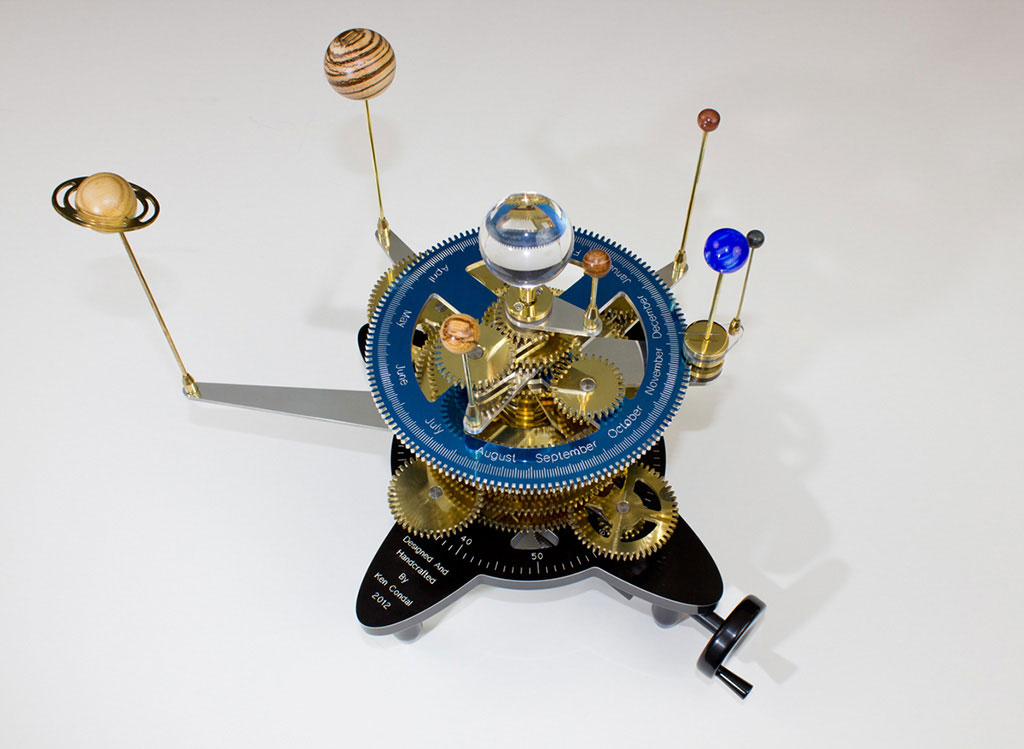
Ken Condal's Orrery. (Click on photo to view larger image.
Ken was now feeling more confident in his abilities with these new machines and wanted to build something more inspiring than a movie prop. He had read an article in Digital Machinist describing the build of a simple Orrery involving only the earth, moon and sun. That article reawakened his memories of beautiful Orrerys he had seen in museums, movies and online. Ken knew nothing about working with gears or even how to make one, but was determined to learn. He found a software package called Gearotic Motion and began playing with it.
Over the next three months Ken read everything he could find about gears and the motion of the planets around the sun. He built a spreadsheet that let him experiment with different gear ratios until he finally found a combination that would drive the moon and the planets from Mercury to Saturn in near perfect proportion to their actual periods around the sun.
He posted his preliminary plans on the Sherline CNC Yahoo group and began asking questions about assembling the Orrery - how the pieces would fit together and how the planet arms could be made adjustable so that the Orrery could be 'set' for a particular date, longitude and latitude. David Clarke, a member of the group and former NASA machinist, jumped at the chance to help out. David came up with a design involving clutches that solved that problem. He also took the time to instruct Ken on proper gear making techniques.
Ken wanted to document the build and also to give back to the YouTube community that had been so helpful in teaching him many of the techniques he had learned thus far. From the first step of the build to the last, he filmed and narrated each process, editing and uploading them as he proceeded.
When he finished the project and realized that he had posted nearly five hours of videos that only the most dedicated people would watch, he made a time-lapse of the build that he titled Orrery Construction Time Lapse - Seven Months in Seven Minutes . That video proved to be his most popular and attracted many would-be machinists.

Ken's next two projects involved Sterling engines, which he knew nothing about other than that they looked cool. More research led him to Jan Ridders of the Netherlands who designs and builds a wide variety of these engines. Jan also provides beautiful plan drawings and detailed explanations of how the engines work.
He chose a model that used magnets instead of a mechanical linkage for the return stroke because it added a bit of mystery to the process. Holding the tight tolerances between piston and cylinder was a challenge, but after a few tries he had it right. The next trick was to figure out how to cut Pyrex test tubes on a lathe. Using a Dremel tool mounted to the cross slide and outfitted with a diamond cutting wheel ultimately proved successful, although many test tubes were sacrificed in the learning process.
When the engine was completed, it didn't work. After trying everything he could think of, Ken contacted Jan and asked for help. Jan was kind enough to spend hours helping him determine what was wrong and eventually the engine was running. Ken says that this willingness by total strangers to work together, even when they're separated by an ocean, is one of the most enjoyable aspects of the hobby.
Now that Ken had a better understanding of how Sterling engines worked, he tracked down plans for a helicopter that several others had built. The design was both esthetically and functionally magnificent, so he dug in and got to work.
Much of the build involved techniques he had learned on previous projects, so for once things proceeded smoothly. The trickiest part was the 3D contouring of the rotor blades. Ken's CAM software supported this, but it wasn't straightforward and required a lot of guesswork regarding step over, cutting depth and the like. It took several tries but ultimately the parts came out beautifully.
As of this writing, this is the last project that Ken built. He's currently looking for the inspiration that will determine his next project.
Ken's project details and build videos can be found at www.zeamon.com
![]()
Photos of Ken Condal's Projects (Click on any photo to view a larger image.)


Wooden Furniture From a laminated kitchen knife block to graceful tables mixing exotic woods, Ken's interest in woodworking dates back to his childhood. As he got better his projects got more ambitious and his finishes improved. His latest pieces are so well done he is often asked where he bought them.

MIDI Guitar A project that involved woodworking, electronics and music is this MIDI guitar with many strings.


Building the guitar involved not only woodworking skills but also designing and fitting the electronics. 


Jedi Light Saber What Star Wars fan wouldn't want one of these? Ken decided to get into making metal parts and was looking for a simple first project. This turned out to be more than just simple, but it taught him a lot about metalworking including programming all 4 axes of a small Sherline CNC machine. The first two photos show the finished saber, while the next three show the parts under construction.


Star Wars Millennium Falcon model "The ship that made the Kessel run in less than 12 parsecs." At least that was Han Solo's claim in the first Star Wars movie. (That spice smuggling run took most space ships 18 parsecs according to Star Wars lore.) Ken's model, which started as a 900 piece plastic kit is super detailed and fully lighted. Check the last photo for how much circuitry had to be hidden inside to get it all to work.

Da Vinci Code Cryptex Inspired by the movie the Da Vinci Code, this device is used to conceal and lock documents. A series of rings and tumblers must be placed in the proper position for it to be opened to reveal its contents. When properly set, a password is spelled out on the outer ring. This was a more complicated machining project that required careful work and ended up beautifully finished.


Building the Cryptex involved using both the lathe and the mill as well as learning how to write the G-code to engrave the lettering on the outer rings using a 4-axis Sherline mill and rotary table. 

Stirling Heat Cycle Engine Stirling engines are powered simply by the difference in temperature between one end and the other. An alcohol flame provides a heat source for the hot end. This engine features clear glass displacer and main cylinders so the piston action can be seen. Stirling engine principle was invented by a Scottish minister in the 1800's, but they are still attracting scientific attention because of their ability to do work with a small amount of energy input.


Stirling Engine Helicopter This project puts the workings of a Stirling engine into the form of a helicopter so observers can see more than just a piston moving. The brass helicopter will not be able to actually fly, but it looks good trying.


Orrery Ken's ultimate challenge so far involved figuring out the gear ratios needed to accurately duplicate the movements of the heavenly bodies in our solar system. This also involved making all the brass gears and getting them to work together. When the hand crank is turned, the solar system goes into motion. This is a project that causes one to appreciate both its difficulty and the beauty of the finished piece.
![]()
If you have additional information on a project or builder shown on this site that your would like to contribute, please e-mail terry@craftsmanshipmuseum.com. We also welcome new contributions. Please see our page at www.CraftsmanshipMuseum.com/newsubmit.htm for a submission form and guidelines for submitting descriptive copy and photos for a new project.
![]()
This section is sponsored by (sponsorship available).
(Your company logo and a link to your web site could go here)
To learn how your company or organization can sponsor a section in the Craftsmanship Museum, please contact terry@craftsmanshipmuseum.com.
RETURN TO MUSEUM HOME PAGE
Copyright 2015, The Joe Martin Foundation for Exceptional Craftsmanship. All
rights reserved.
No part of this web site, including the text, photos or illustrations, may be
reproduced or transmitted in any other form or by any means (electronic,
photocopying, recording or otherwise) for commercial use without the prior
written permission of The Joe Martin Foundation. Reproduction or reuse for
educational and non-commercial use is permitted.


